April
|
The new seedlings are now planted
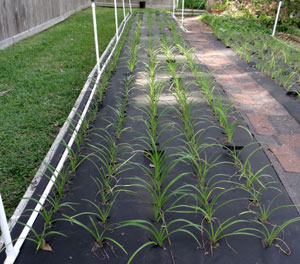
The new seedlings have now been transplanted from the trays to the new seedling bed.
The planting process, while a fair amount of work, is also a time of reflection. As each plant from a cross is placed in the soil, I like to think about what it might look like when it blooms. Yes... another time when a hybridizer can dream of what might come (smile).
You may be able to tell from the picture that all the fans are planted with the leaves perpendicular to the row. No, this isn't some sort of Feng Shui thing. I do this so that the leaves of a larger seedling will not shade a smaller seedling (at least until they have grown some).
I have seen discussions about whether daylilies prefer to have their fans oriented north and south or east and west. Personally, I don't think they care. One of my seedling beds has rows going north and south while the other has rows going east and west and I haven't seen any difference from one bed to the other.
|
Planted bed
|
|
|
First blooms of the season
The first bloom of the season can come as early as late March or as late as late April but the first new seedling usually blooms in early to mid April here in my Houston garden.
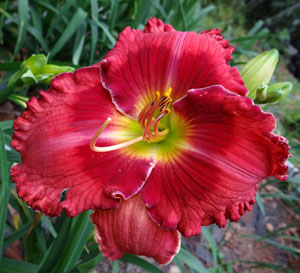
I don't know why but the first new seedling to bloom each year is often a dog. Maybe it's just that I have built things up in my mind so much that I'm expecting a Silver Stout Medal winner from the first bloom (which will probably never happen). Sometimes however the first bloom is nice such as this image which was my first bloom in 2013.
When a new seedling blooms that I think has some merit, I first take a picture and assign a number to it. The number for this one was 13-001 where 13 is the year the seedling first bloomed, and 001 is the first marked seedling from this new batch.
Then I mark it using the marking flags that I purchased from AM Leonard and pre-numbered sequentially. I place the flag as close to the blooming fan as possible without actually stabbing the fan. Each flag has the number written on it and then folded over to protect the number from the sun. The number is also written on the outside. I use a Sharpie to write the numbers.
I then write down the stats of the seedling which include bloom size, scape height, number of branches on the scape, and the number of buds. The stats are entered in a spreadsheet to be used later when I'm deciding which seedlings to keep for further evaluation.
|
Seedling 13-001

Flag
|
|
Evaluating and marking the new seedlings
Every day at during bloom season I walk the new seedling bed looking at the first blooms to decide which I want to mark for possible future consideration. I learned early on that there will be lots of pretty faces each year and I just don't have room to keep them all. So there's no sense flagging every pretty daylily. In addition to the marking the obvious keepers, here are some of the questions I ask myself as I decide which seedlings to flag.
- Does this seedling have a higher bud count than the majority of other seedlings? (these can make great garden plants)
- Does this seedling have better color qualities than other seedlings? (stands out in the garden)
- Does this seedling posess some unique characteristic that other seedlings don't?
- Does this seedling look like it might have 'unrealized potential'? (some daylilies aren't at their best the first year bloom)
- Does this seedling have any special 'presence' in the garden? (for me this means I'm marking it just because I like it)
- Does this seedling have something to offer to my hybridizing program even though the seedling itself may have some faults?
Of course with the exception of the last item, any seedling selected will have to pass some minimum standards such as attractive bloom form and color plus decent growing habits. I'm not as particular about these things at this point as I will be later on because this is the plants first year and they usually get better the second year.
I always try and mark more seedlings than I expect to plant in the evaluation bed. I do this partly because I won't know exactly how many I will have room for until the fall. Also, some new seedlings don't make it through the long hot summer months and I want to make sure no matter what, I will have enough seedlings to select from to fill the spots I will have in the evaluation bed.
Each year there are a few seedlings that for one reason or another I know won't get selected for further evaluation but are of significant quality that I know they would be appreciated in somebody's garden. I have some short flags that I use to mark these. Then when I dig plants for friends and co-workers I can include these as I know they have attractive blooms.
|
|
The pollination process (post 1 of 3)
Before I launch into a discussion on the routine I use for pollinating I thought I'd better explain why I am so methodical about the way I go about it. The busy season at my day job comes at the same time as bloom season so I can't take any time off from work to pollinate. Instead, I have to do it during my lunch break. With such a short time window I have to know exactly what crosses I will be making each day. Having a list of the plants that will be blooming that day with the pollen that I want to use with each is the only way I can get my crosses made. Preparing the next day's planned crosses can be done in the evening after work. Here is my process.
I have a checklist of all the cultivars that I am using in my hybridizing. The cultivars are in the same order they appear in the garden. I used a spreadsheet program to create the list. In the early evening I walk the garden and checking off the plants that will be in bloom the following day on the checklist. Here's an example of the top of my checklist.

In my Excel stud workbook I have a daily pollinating worksheet (example below). Using a copy of this worksheet I place an 'X' in column A for each cultivar that will be in bloom the next day. This is quick because the cultivars are in the same order as the checklist. I then sort the worksheet on column A and the Pod column. This gives me an alphabetical listing of just the cultivars that will be in bloom the next day.

|
|
The pollination process (post 2 of 3)
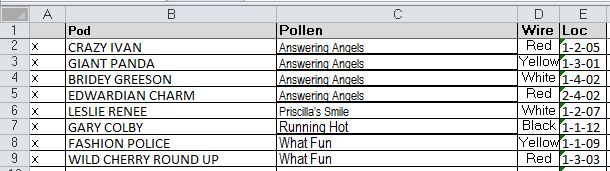
Now that I have an alphabetical list of just the cultivars that will be blooming tomorrow, I look each one up in my stud worksheet to see if which of the planned pollen plants will also be blooming tomorrow. When matches are found, I decide which pollen I'll use and enter the pollen plant name in the pollen column of the daily pollinating worksheet (above) and the pod plant name in the stud worsheet beside the color of the wire that will be used. The wire color is also entered on the daily pollinating worksheet. Here's an example of my stud worksheet.

Early in the bloom season if I don't have any of the primary crosses for a cultivar blooming, I usually just don't pollinate the bloom. I figure I can pollinate a later bloom. As the season progresses however I will start using the secondary crosses. If I have a special pod plant that needs pollination late in the season and it doesn't look like any of the pollen plants in my plan will be blooming, I may go back and see if I can find another acceptable cross that will be blooming shortly.
Once all the pollen parents (and wire colors) have been entered, I sort the worksheet on the pollen column and the location. This puts the list in order by the pollen and within each pollen plant, it lists the pod plants in the same order as the are found in the garden. Then I print out the plan for use the next day. Example of completed sheet below.
|
|
The pollination process (post 3 of 3)
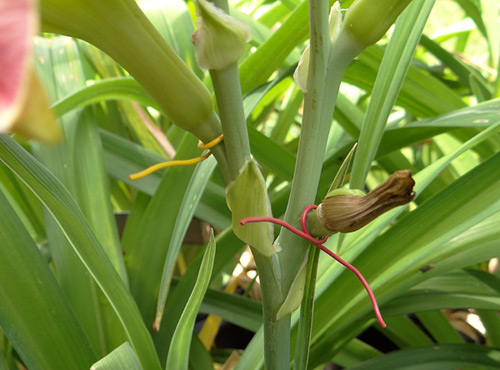
In the morning it's time to pollinate the blooms using the sheet I prepared the previous evening. Starting at the top of the list I pick one or more stamens from the first pollen cultivar on the list. I then dab the pollen on the pistol of each of the pod cultivars listed for that pollen. After applying the pollen I twist a wire with the appropriate color around the stem of the bloom as close to the bloom as possible. Placement of the wire is important as it has to be clear which pod the wire goes with when harvesting the pods later. I then do the same for each pollen cultivar on the list until all pod blooms have been pollinated.
This is probably a good place to mention that I usually don't set more then 2 pods on each scape (3 if it's a vigorous grower). This is my own personal practice and it's based on knowing the seed production will take its toll on the plant. I don't want to stress the plant too much.
Following the plan in this organized fashion allows me to pollinate a lot of blooms during my lunch break.
For the most part I follow the printed plan. Occasionally however I'll see a potential cross that don't have in my stud worksheet. It's usually something that I overlooked when I filled out the worksheet. If the cross makes more sense than any of the current crosses in the worksheet I may replace the least likely cross in the worksheet with the new one (as long as I haven't already done the cross in the garden).
|
|
Colored wires for marking crosses - my 4-color system
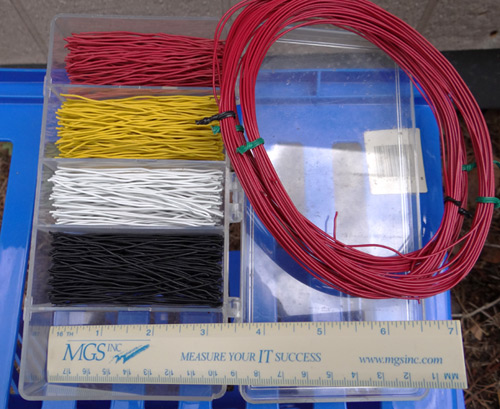
I mark my crosses by twisting colored wires around the base of the pollinated blooms. Using only use four different colors keeps it simple and having a relatively small program, I don't need to make more than four different crosses on any one cultivar. There are some who use the wire from inside large diameter telephone cables because it has multiple different color stripes giving a great variety of unique color combinations. I guess this works too but it seems terribly cumbersome to track so many possible combinations when I can accomplish the same thing with only four colors and a little record keeping.
Using only four wire colors means I have to keep good records of what each color means for each cultivar. If I know the cultivar the pod comes from and what wire color it was, I can use the stud sheet to identify the pollen parent.
Finding the right wire can be a problem. Stranded wires don't hold their shape very well when you twist them around a bloom. A solid core wire does hold it's shape but you have to find one that is relatively soft and flexible. It's the insulation that is colored and a lot of wire today will fade in the sun. I purchased my wire back in 2002 and you can see from the picture that they don't seem to have faded at all. I found my wire in a surplus electronics parts store. The store is now closed but they still sell online.
|
|
|
|
| |